The roast chicken from Zuni Café in San Francisco is legendary.
The Accidental Locavore has never had it, and funnily enough, my friend in SF who has eaten there many times hasn’t either.
It’s on her list now.
I’ve been making this recipe for a while and it just keeps getting better and better! The skin is amazingly crispy and the white meat stays juicy.
You need time — at least overnight, a couple of days is better — and space in your fridge. It’s worth it.
Zuni Roast Chicken
- 1 chicken (small and a really good chicken is best here)
- 4 sprigs of thyme, rosemary, or sage about 1/2″ long
- Salt and pepper
Seasoning the chicken:
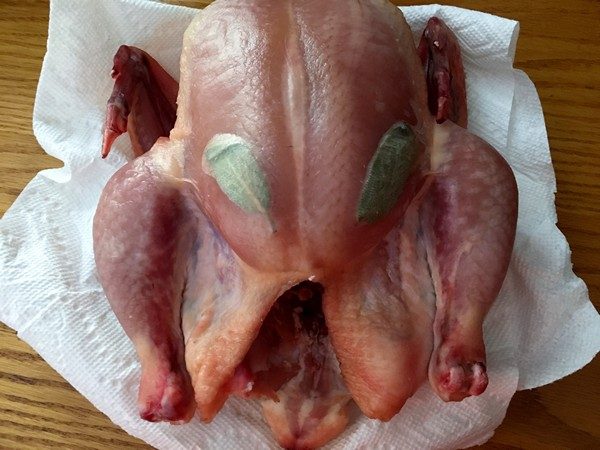
1-3 days before roasting, rinse the chicken and pat it really dry, inside and out. Be thorough, you need the chicken really dry to get the crispiest skin.
Gently slide your finger under the skin on each breast, loosen and make a little pocket on each side. Using your finger, push an herb sprig into each pocket.
Turn the chicken over and do the same on the outside skin on each thigh.
Season the chicken liberally with salt and pepper. Put on a paper towel-lined plate, cover loosely and refrigerate.
 Roasting the chicken:
Remove the chicken from the refrigerator and let come to room temperature.
Preheat the oven to 450-475° (see below).
Choose a shallow flameproof roasting pan or a 10″ skillet with a metal handle (I use my cast iron pan). Preheat the pan over medium heat.
Wipe the chicken dry and set it breast side up in the pan. It will start to sizzle.
Place it in the center of the oven. It should start to brown and sizzle within 20 minutes. If it doesn’t, gradually raise the temperature until it does.
The skin should start to blister, but if it begins to char or there’s a lot of smoke, drop the temperature by 25°.
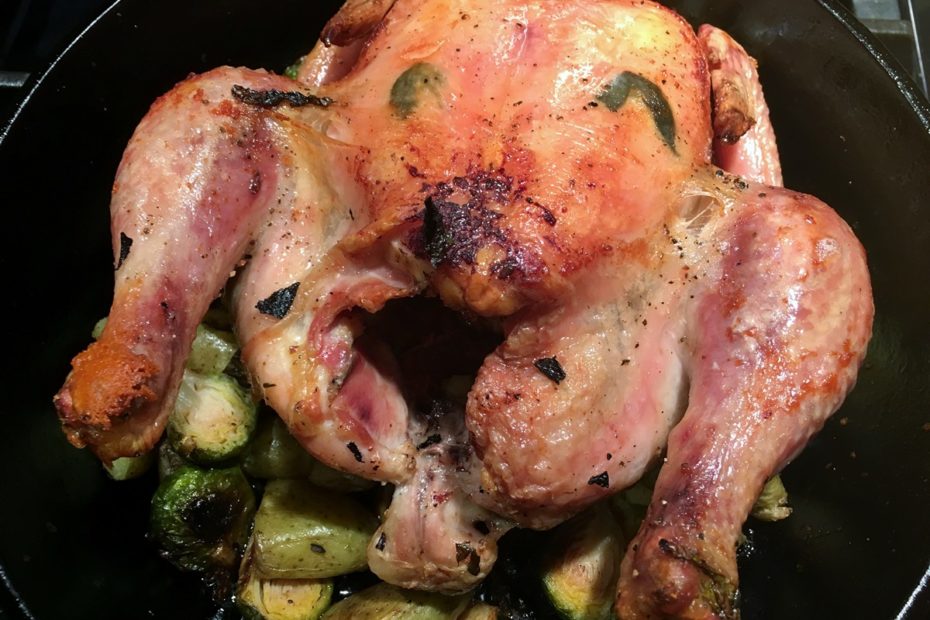
After 30 minutes (total time), turn the chicken over and roast for 10-20 minutes, depending on the size. It should be golden brown and the skin should look crispy.
Turn the bird over again and recrisp the skin—about another 5-10 minutes. Total cooking time 45 minutes to an hour.
Remove from the pan and let rest. Carve, serve and enjoy!
My verdict:
The instructions sound a little difficult and intimidating at first, but if you make it more than once (and you will), it’s actually pretty easy. It makes such a great roast chicken, it’s really worth it!
Accidentally, I left the chicken drying last week, a day longer than anticipated, and the skin was the crispiest it’s ever been, so if you can give it 3 days, do.
The size and quality of the bird really matter here. It’s so good, you’ll be tempted to do a bigger bird, but if you can keep it to about 3 pounds, that’s ideal.
When you’re seasoning it, use more salt and pepper than you think, it just enhances the flavor!
Be very careful pulling the chicken out of the oven to turn it–I’ve melted more oven mitts with this dish! There are very few oven mitts or pot holders that are safe after 400°. Even using two together, while I didn’t get burnt, there was the smell of neoprene starting to melt. So far, the best one is a monster mitt my brother sent me.
When I flip it over the first time, I often add some partially cooked chunks of potato and/or some Brussels sprouts (also partially cooked) to roast under the chicken. While you don’t always get enough “stuff” to deglaze the pan after, the potatoes roasted in the chicken fat, really make up for that!
Oven temp: Depending on your oven and the size of your bird, you may need to adjust the oven temp as high as 500 or as low as 450 to get it to brown properly. I’ve been doing it at 450° convection roast and have been getting great results. With a bigger chicken, you might have to kick it up a bit and/or give it a little more time.